How I Custom-built My Markdown Blog

A while back, I had a personal website built to show the portfolio of projects I had completed up to that point. It was built on Rails, my technology of choice at the beginning of my software career. Many years later, I decided to rebuild my site as a blog to jumpstart my motivation and creativity.
Here's how I built this site using modern technologies and sensibilities.
The Use Case
I love building things and writing. That said, I didn't have an up-to-date place to put up anything. I figured that I should try to share my work and thoughts in a blog format where each post could stand alone. Eventually I would organize pieces to be more cohesive.
This blog would be an archive of myself and my work over the years. Mostly I would write about software but I figured that I could branch out into my other interests over time.
My goals were to bring myself joy in both developing johnapostol.com and when writing content.
Joy in coding
- Fun to write code for the blog
- Scalable technology
- Proud to be fully custom made
Joy in writing
- Fun to write content for the blog
- Easy to manage and publish
- Displays code samples as beautifully as prose
I had started a Medium account not too long before I began this project. I liked the ease of putting up content on Medium, but more than anything, I really liked the way Medium looked. After some sleuthing I found that I could syndicate my content to Medium and get canonical references back to my own domain.
I could also seed my blog with content I had already written on Medium. Sweet!
My Tech Choices
One of my favorite parts of any project is picking my tech at the beginning. In projects like these, I usually reach for a mix of my favorite tools and also treat this as an opportunity to learn some new ones.
TypeScript
I'm a big fan of static typing in a JavaScript environment. At one point, flow was my go-to, because types were easily stripped away without a compiler. I could continue to rely on babel for JavaScript compilation. These days, TypeScript boasts the same capability as well as overwhelming community support. If I can easily use TypeScript in any project, I will.
Next.js
I see no better way to get a fully custom website up and running other than writing it with the Next.js framework. It allows for ultimate control on top of very sensible defaults. See, I like using babel, webpack and TypeScript, but I don't like working hard to configure those tools. Most of the React-flavored frontend toolchain is taken care of with a simple Next.js application. Oh and I wanted to use React under the hood because of familiarity and overall ease of development.
Lastly, I felt empowered to build my app as a static site. I felt that Next.js had the best guidance for building that while giving me freedom to pepper in dynamic functionality with serverless functions and APIs if I ever decided to go down that road.
Vercel
Heck, if I'm using Next.js, which was created by Vercel, I may as well host my app on Vercel. Their Hobby tier is free forever and with careful management of my dynamic content (I have none in production), I could skate by with their usage limits indefinitely. Next.js and Github integration are top-notch. Not to mention the edge CDN. I had managed to avoid paying for server costs with my last host, why start now?
Markdown
I'm comfortable with Markdown syntax. It's simple to read and write, and looks great in diffs as well. I didn't want to deal with custom formatting HTML elements and working with WYSIWYGs. Markdown content is also very portable. I had seen other people bend Markdown formatting to their presentation needs and knew I could too.
Why not Gatsby?
Gatsby was still coming into its own as a Cloud provider at the time. While the static React framework was great, I didn't see much benefit moving away from the Next.js + Vercel ecosystem.
Main Concepts
Now with something to build and some tools to build it, I had to find a way to tie everything together neatly in a repo. I got to work.
Next.js + TypeScript + Vercel came together beautifully. The most I had trouble with for these pieces was learning about the new features and breaking changes in the latest Next.js release and figuring out if I should be using interface or type keywords when typing my React component props.
The first real problem came when I tried to realize my vision of writing in Markdown and having React components format my words. It was (and is) very doable with plenty of examples online. Before thinking of solutions, though, I really had to consider the problem.
I wanted to write content in Markdown and host all of that in a single repository with no database or server-side logic. All logic had to be performed at compile time.
This was in order to scale my blog for free within Vercel's generous usage limits.
Thinking as a user
One nice thing about a personal project like this is I'm the user. I could consider how much involvement and manual effort I would stomach to get this thing built. And if I wanted to favor DevX over UX at any point, I could just do it.
As John, the writer, I wanted to write content in only Markdown. My primary directive was that no HTML should clutter up my words as I wrote.
Code
After identifying my needs as a user, I could zero in on the code needed to reach my goals. First, I needed a library that could parse Markdown and allow me to process formatting like italics, bold, or code into React components that I could custom style.
Thankfully, there's an excellent library for this called react-markdown. It elegantly handles Markdown rendering by allowing you to specify what component should be responsible for rendering each bit of formatting. See how it's used in [slug].tsx.
1// [slug].tsx2import React from "react";3import ReactMarkdown from "react-markdown";4import CodeBlock from "../../components/CodeBlock";5import Heading from "../../components/Heading";6import Image from "../../components/Image";7import Link from "../../components/Link";8import Paragraph from "../../components/Paragraph";910const Post = () => {11 const renderers = {12 code: CodeBlock,13 heading: Heading,14 image: Image,15 link: Link,16 paragraph: Paragraph,17 };1819 return (20 <ReactMarkdown source={postBody} renderers={renderers} />21 )22}23...
Now I could render Markdown into bespoke components for my blog! My content looked as follows. Notice the frontmatter at the top of the file, which is used for metadata.
1---2title: "Using Redux with Vanilla JS"3preview: "What follows is an explanation of how I've used Redux to make a production vanilla JS app more maintainable."4slug: "using-redux-with-vanilla-js"5tags: ["software", "javascript"]6---78910Redux is a popular state management library for JavaScript apps that is routinely paired with frameworks like React or Angular. What follows is an explanation of how I’ve used Redux to make a production vanilla JS app more maintainable.1112I’m hoping this is useful for anyone out there who is looking for a real-world Redux + vanilla JS example beyond a button incrementer or to-do app.
The next trick was figuring out how to import my Markdown files at build time. I could have gone the loader route, which would allow me to import raw .md into my pages, but decided that it would serve me better to convert my Markdown files into JSON for making simple queries. This allowed me to build out dynamic slugs with the Markdown frontmatter and have an index of posts to display on my site.
For that, I needed the help of processmd to.. process my .md.
I wired up a build command in my package.json to run processmd with file-watching so that it would run as I updated my Markdown files.
1// package.json2...3"scripts": {4 ...5 "watch:posts": "processmd posts/*.md --outputDir content --summaryOutput content/summary.json --watch"6},7...
As I wrote out my content, processmd would create .json files, one for each post. Let's take a look at getInitialProps() within [slug].tsx.
1Post.getInitialProps = async ({2 query: { date, preview, slug },3}) => {4 const { bodyContent, title } = await import(`../content/${date}.json`);56 return {7 date,8 postBody: bodyContent,9 preview,10 slug,11 title,12 };13};
Another neat thing about processmd is that it can create a summary.json manifest file for you. I used this to list out all the posts I had available on my blog.
1// summary.json23{4 "fileMap": {5 "content/2019-01-30.json": {6 "title": "Using Redux with Vanilla JS",7 "preview": "What follows is an explanation of how I've used Redux to make a production vanilla JS app more maintainable.",8 "slug": "using-redux-with-vanilla-js",9 "tags": ["software", "javascript"],10 "dir": "content",11 "base": "2019-01-30.json",12 "ext": ".json",13 "sourceBase": "2019-01-30.md",14 "sourceExt": ".md"15 },16 ...17}
Now, if I import summary.json, I could display a list of my posts on the index page. I'll zoom in on the important part.
1...2export const getStaticProps = async () => {3 const summary = await import("../content/summary.json");4 const { sourceFileArray, fileMap } = summary;56 const recent = sourceFileArray.slice(-5).reverse();7 const posts = recent.map((sourceFile) => {8 const destFile = sourceFile9 .replace("posts/", "content/")10 .replace(".md", ".json");1112 return {13 ...fileMap[destFile],14 date: fileToDate(destFile),15 };16 });1718 return { props: { posts } };19};
Now that the guts of my development and writing process were in place, I could go about styling the individual components that make up each post.
Inspired by Medium
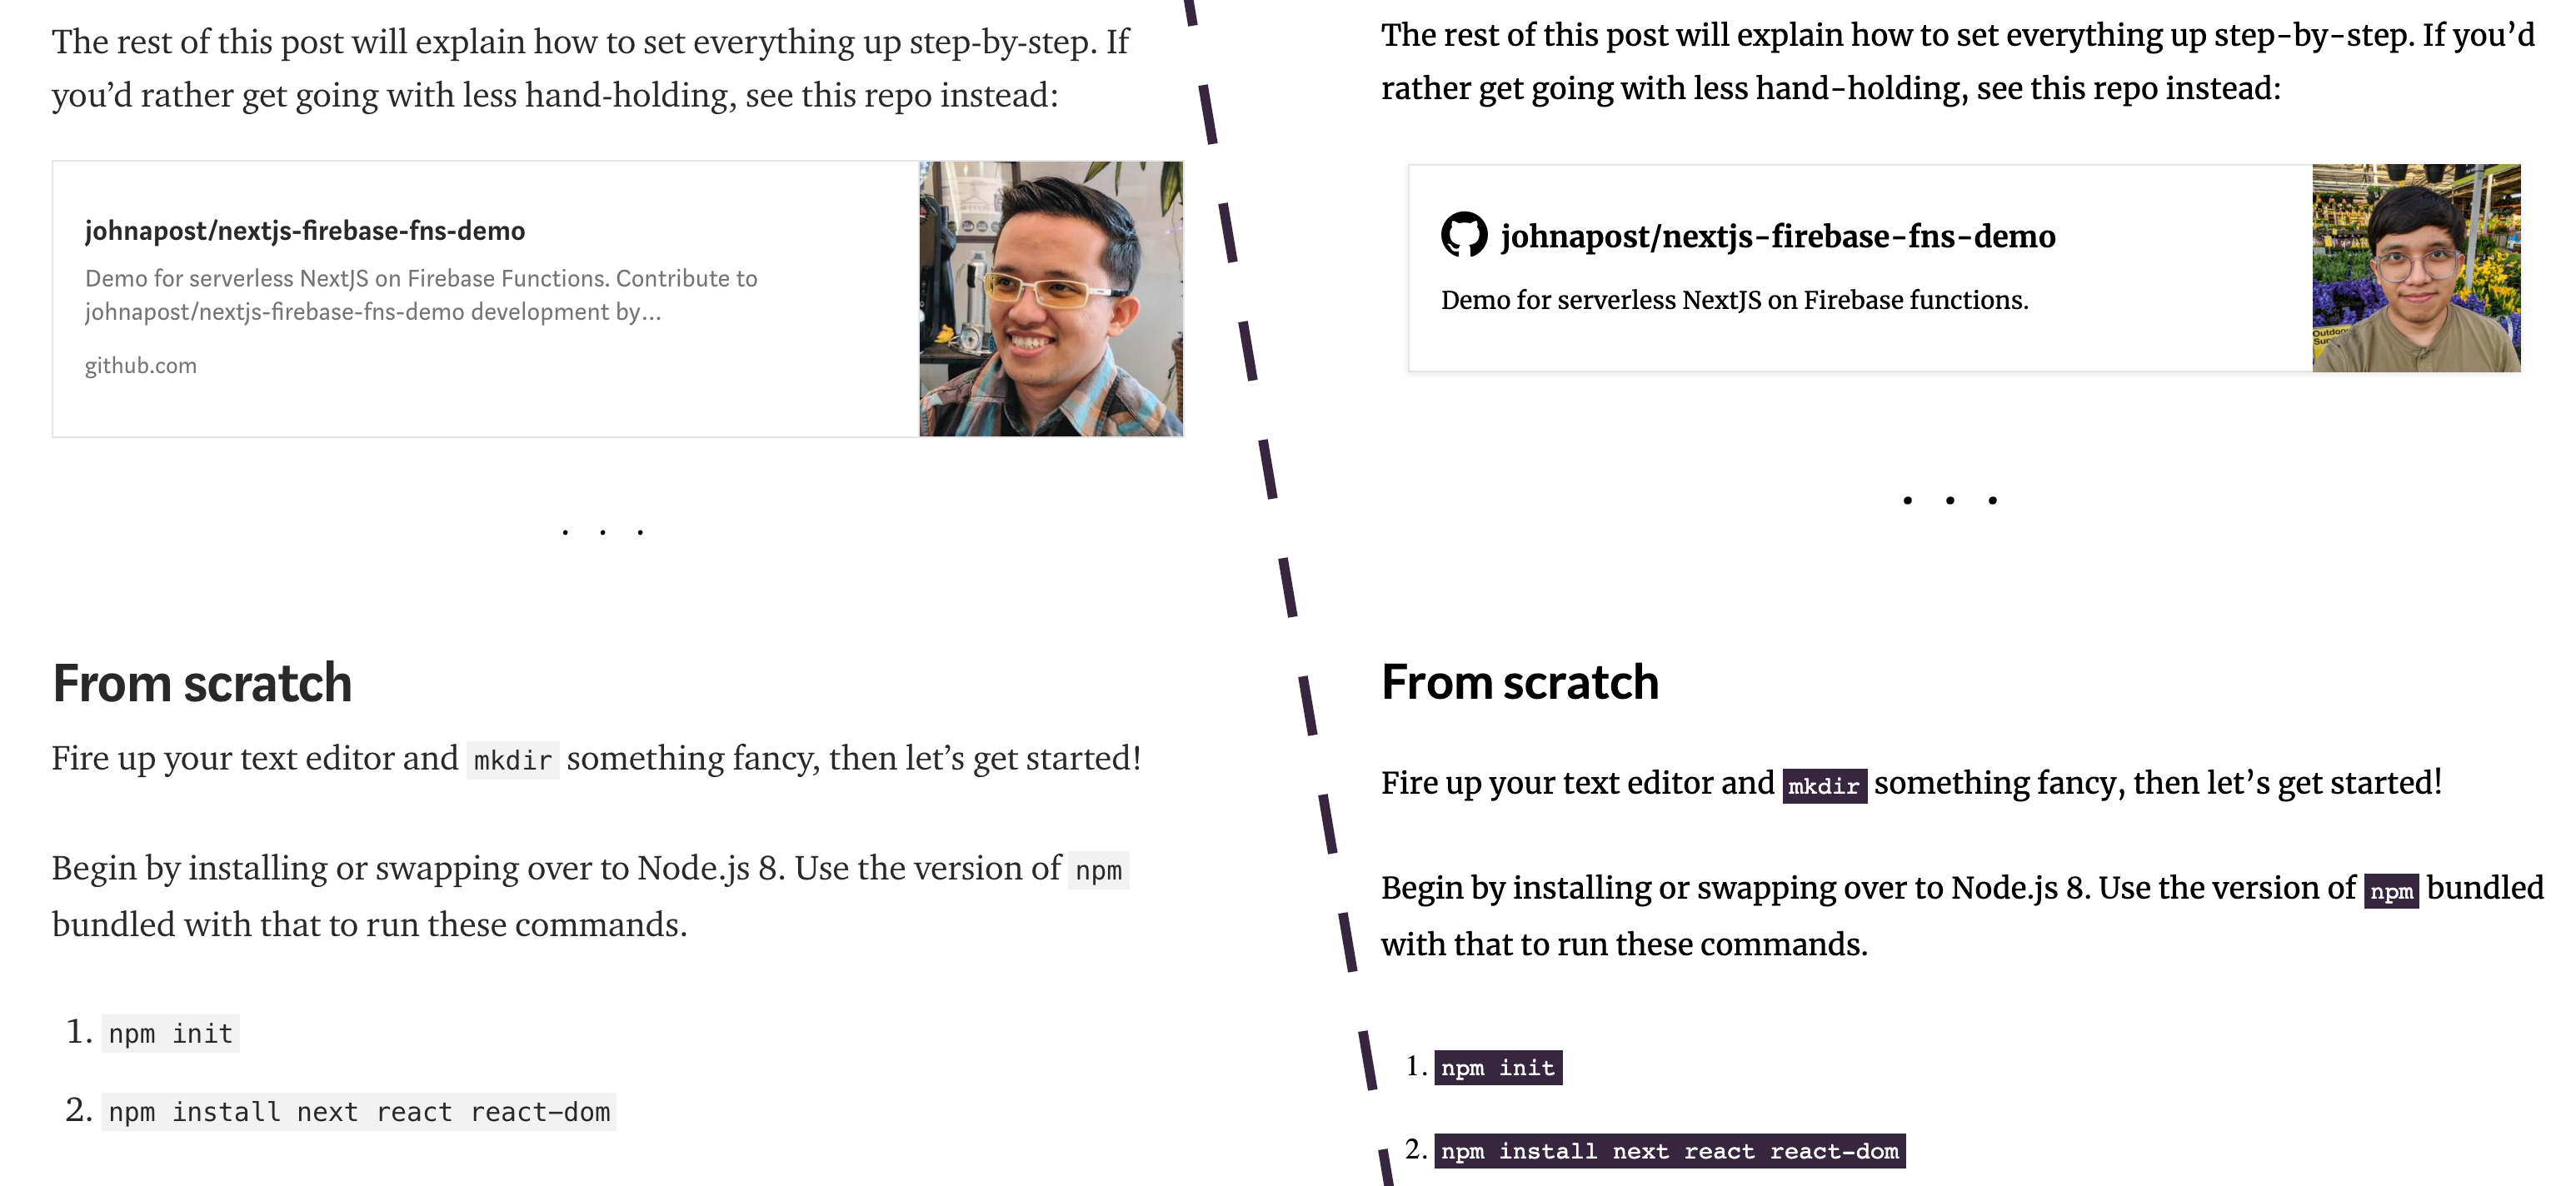
I'll be perfectly honest, Medium has an amazing reading experience. I could write absolute drivel and it would look good on Medium. There's plenty of air and space that makes it a pleasure to read. I didn't think I could do any better without a big investment like hiring a designer.
I figured the best way to make my content pop was to lift styles from the best source. I dug into Medium's styles and lifted what made sense, tweaking and adjusting to retain the same breezy qualities, while fitting my own sensibilities.
You can see the difference between the styles for my Building a Serverless React App on Firebase Functions post hosted on my blog and syndicated on Medium.
Polishing
I had some room to get fancy with all the raw pieces coming together. I wanted a clean way to show my author byline and my post title. I played with a couple options and ultimately decided to have a byline that transitions into a sticky navigation element as readers scroll. It took a lot of finessing and I'm very proud of the final effect.
Not yet done
My blog is being continually improved, both through code and content. Maybe my pace of delivery isn't great (this post has been in draft for 4 months), but I greatly enjoy using what I built.
There were some final problems I still had to overcome! At a certain point, it became clear I had made a mistake in having my site be fully static code driven. I had to eventually move away from my processmd setup. In a follow-up post, I will get into how I migrated from a static generated blog into a CMS-driven static generated blog powered by GraphCMS. Please look forward to it.